Remember those days when playing with your food was frowned upon? Well, those days are over! Welcome to the world of Dirt Cups – a fun, playful, and absolutely delectable dessert that I absolutely adore. It’s a recipe that not just satisfies your sweet tooth, but also unleashes your creativity. The concept of Dirt Cups originated as a fun project for kids, but let’s admit it, adults love it just as much. Who can resist the layers of creamy chocolate pudding, fluffy whipped topping, and crumbly chocolate sandwich cookies? Not to mention, the delightful surprise of gummy worms and candy flowers popping out of the ‘dirt’! In this blog post, I’m going to share with you my favorite Dirt Cups recipe, along with some helpful tips to make it perfect every time. If you’re ready for some fun in the kitchen, let’s get started!
Ingredients
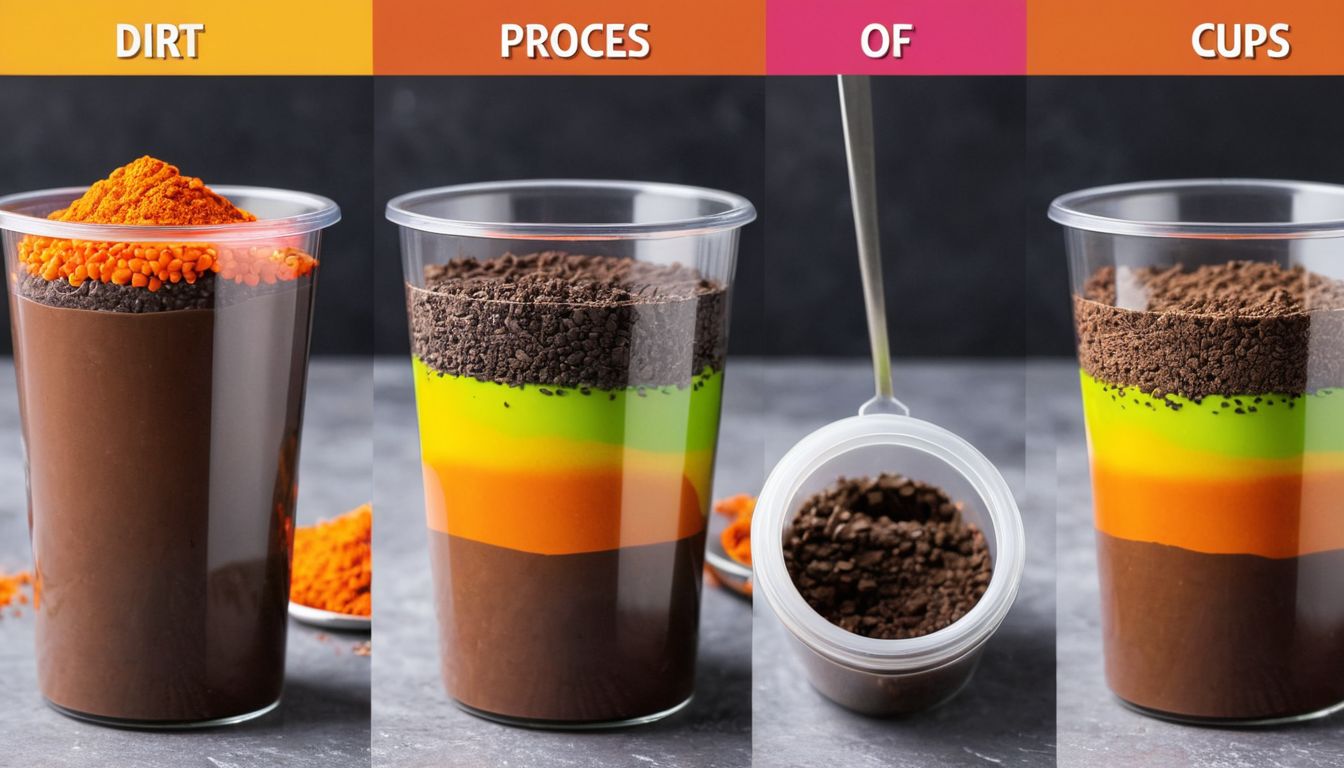
- 2 c. cold milk
- 1 (4 serving size) pkg. chocolate instant pudding
- 1 (8 oz.) tub whipped topping
- 1 (16 oz.) pkg. chocolate sandwich cookies, crushed
- gummy worms and frogs
- candy flowers
Mixing Instructions
- Will also need 8 to 10 (7 oz.) clear plastic cups
Calorie: 250
Total cooking time: 15 minutes
Difficulty level: Easy
The Chronicles of Making Dirt Cups
Before we get into the epic tale of my recent culinary undertakings, let’s establish the context. I was tasked with creating a kid-friendly, fun, and tasty dessert for my nephew’s birthday. And that’s how I found myself embarking on the journey of making Dirt Cups. Not your standard Michelin-star fare, I grant you, but let me tell you, this stuff would put any fancy-pants dessert to shame.
The Ingredients Gather
The first part of my quest had me assembling the following: 2 c. cold milk (straight from the fridge, because room temperature milk is the enemy here), 1 (4 serving size) pkg. chocolate instant pudding (because who has time for the non-instant type?), 1 (8 oz.) tub whipped topping (the fluffier, the better), 1 (16 oz.) pkg. chocolate sandwich cookies, crushed into oblivion (and let me tell you, there’s a certain satisfaction in pulverising cookies), and of course, the pièce de résistance: gummy worms, frogs, and candy flowers (because what’s a dirt cup without a bit of garden wildlife?)
The Cookie Carnage
Now, crushing chocolate sandwich cookies might sound like a simple task, but let me tell you, it’s a mission. You start off all civilised, with a rolling pin and a sense of dignity. But before you know it, you’re knee-deep in cookie crumbs, wielding the rolling pin like a weapon, and laughing manically at the cookie carnage that surrounds you. It’s a cathartic experience, to say the least.
The Pudding Predicament
The next step was to make the chocolate instant pudding. Pretty straightforward, right? Wrong. You see, I thought I could get away with eyeballing the amount of cold milk. After all, how much difference could a little extra milk make? Well, let me tell you, it makes all the difference. My pudding consistency ended up somewhere between a soup and a milkshake. Lesson learned: precision is key.
The Assembly Adventure
Armed with my liquidy pudding, crushed cookies, and a tub of whipped topping, I set about assembling the dirt cups. The trick here is to make sure each layer is evenly spread before adding the next one. This is where the clear plastic cups come into play. They allow you to see the layers, and more importantly, they let the kids see the gummy worms and frogs hanging out in the ‘dirt’.
The Finishing Touch
The final touch was adding the candy flowers on top. This might seem like an unnecessary step, but trust me, the look on the kids’ faces when they saw those flowers poking out of the ‘dirt’ was priceless. It’s all about the details, my friends.
The Verdict
So, how did my dirt cups turn out? Well, aside from the minor mishap with the pudding, they were a hit! The kids loved them, and I even caught a few adults sneaking a cup or two. So, would I make them again? Absolutely! But next time, I’d probably measure the milk.